

Before the Bin: Creative Ways to Reuse Fruit & Veggie Scraps
- Jan 12
- 5 min read
Composting is one of the best ways to reduce food waste, but there’s often one more useful step you can take before putting those vegetable and fruit scraps into your compost bin. Many of these food scraps will still have flavor, nutrients and potential. Even fruits and vegetables that are starting to go soft, wrinkled, or slightly past their prime can often have another life with a little creativity. These odds and ends can be turned into pantry staples, kitchen essentials, flavor boosters, and even crafts!
Check out these easy ways to reuse veggie and fruit scraps before tossing them in your compost bin.
1. Dehydrate Fruits and Vegetables - Preserve what you can; preserving scraps helps extend their life and keeps useful ingredients on hand for later which helps save money in the long run. Dehydrating is a simple way to turn scraps into shelf-stable ingredients.
Fruit scraps: Apple peels, citrus rinds, strawberry tops, and pear skins can be used in teas, baked goods, or as snack toppers.
Vegetable scraps: Vegetable scraps can be dried and used in soups, trail mixes, stir-fries, or eaten like chips.
Slice into thin, equal slices and dry in a dehydrator or oven (around 125°F/50°C) until brittle and moisture-free. Once fully dried, store in airtight containers. Take it a step further and use a grinder or blender and grind cooled, dry pieces into a powder for dishes where you need a nutrient boost or homemade seasoning! Consider adding powdered fruits into smoothies or baked goods.

Pro Tip: Dehydrated fruits can make beautiful decorations for your home too! The picture on the left shows dehydrated oranges and lemons hung above a kitchen table.
Syrups, Broths, & Sauces - Turn scraps into flavor; many fruit and vegetable scraps are packed with flavor which makes them ideal for syrups, broths, and sauces. This not only reduces waste, but can also stretch your groceries further by building flavor from ingredients you already have.
Syrups: Berry trimmings, pineapple cores, citrus peels, or even overripe fruits can easily become flavorful syrups for drinks and desserts.
Simmer fruit scraps, water, and sugar in a 1:1:1 ratio for 20-30 minutes, uncovered on a low-to-medium heat. Simmering is key. Once the scraps look pale, the liquid is fragrant and deeply colored, then strain, cool, and store in the refrigerator for up to a month. These syrups are perfect for cocktails, mocktails, sparkling water, and even pancakes, oatmeal, or waffles!
Broths: Herb stems, onion skins and ends, carrot tops and peels, celery leaves and bases all make great scraps for vegetable broth.
Keep an airtight container in the freezer and add your food scraps as you cook. Once you’ve accumulated about a gallon of vegetable scraps, put scraps in large pot and fill with enough water to fully submerge scraps. Simmer for 45-60 minutes partially covered. Unlike meat broths, vegetable broths don’t benefit from long simmering; cooking vegetable scraps too long can lead to bitterness. Once the vegetables look faded and soft and the broth smells rich and savory, strain and store in airtight container in the refrigerator to use within a week, put in the freezer for 6-12 months or can it for a longer shelf life of 1-3 years. Compost spent veggie scraps.
Pro tip: add dehydrated vegetable powder for a flavor and nutrient boost.
Sauces: Carrot tops, radish greens, kale stems, beet greens, arugula, cilantro all make delicious pesto, chimichurri, or herb sauces.
Blend greens with oil, garlic, pine nuts, and parmesan cheese for a versatile spread or pasta sauce.

Sample Kale Stem Pesto Recipe
2 cups kale stems (chopped)
½ cup olive oil
¼ cup parmesan cheese (grated)
2-3 garlic cloves
¼ cup pine nuts
1 tbsp lemon juice
Salt and pepper to taste
Directions: Heat skillet, add pine nuts, toast until fragrant. Be careful – pine nuts can burn quickly! Add kale stems, olive oil, parmesan cheese, garlic, toasted pine nuts, and lemon juice into blender or food processor. Pulse until finely chopped. Add salt and pepper. Adjust to taste. Serve with crackers or bread.
Get creative with it! Swap out pine nuts for walnuts or pumpkin seeds. Experiment with different cheeses. Serve with crackers or with a pasta dish. Store any leftovers in an airtight container in the refrigerator for up to a week.
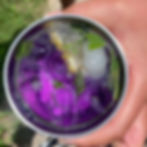
3. Make Natural Dyes - Create something unexpected; not all scraps are for eating. Some fruit and veggie scraps can be used as a natural dye. Even scraps that are dry, wilted, or past their prime work just as well as fresh ones. It’s a great way to explore low-waste crafting and give food waste one more life before composting.
Natural dyes work best on natural fibers such as cotton, linen, wool, or silk. Start by prepping your fabric with a mordant. A mordant helps the color stick and can be made with items you probably already have in your kitchen.
Prep the Fabric
Dissolve ¼ cup salt in 4 cups hot water for linen or cotton. For wool or silk, dissolve a ¼ cup vinegar and 4 cups water. Soak the fabric for at least 1 hour, rinse lightly, and set aside. Do not dry.
Prepare the Dye Bath
Fill a stainless steel or enamel pot with vegetable scraps and add enough water to fully cover them. Simmer for 30-60 minutes. Once the water is deeply colored, strain out the scraps and compost them.
Popular Options
Beet scraps for rosy reds
Red cabbage for blue, purple, or teal
Turmeric for bright yellow hues
Coffee for tans and light browns
Yellow onion skins for golden yellows and oranges
Avocado pits and skins for soft pinks

Dye the Fabric
Add wet, pre-treated fabric to the stained dye bath and simmer for 30-60 minutes, stirring occasionally. For deeper colors, let fabric cool and sit overnight.
Image: One curtain in a turmeric dye bath.
Rinse and Dry

Rinse with cool water until fabric runs mostly clear. Hang to dry away from direct sunlight. Colors will lighten slightly as fabric dries; natural dyes are part science and part surprise. Don’t be surprised if your colors vary.
Image: Finished result of two curtains in turmeric bath.

Fun idea: Eliminate the need for the stove by using the heat of the sun! Add vegetable scraps, fabric, and water to jars and leave outside for at least a month if not the whole summer.
Scraps used in image from left to right are turmeric, indigo leaves, avocado peels, avocado pits, and coffee grounds.
You don’t need to do everything at all once. Start small and have fun with it! Small changes can add up to meaningful waste reduction. Once you’ve preserved, cooked, or created with your scraps, compost whatever remains. Reusing food scraps doesn’t replace composting, it makes it even more impactful by getting the maximum value before returning nutrients to the soil. Consider it like closing the loop and ensuring nothing goes to waste. Next time you’re about to toss scraps into the compost bin, ask yourself: “can this be used one more time?”
We would love to see your creations! Email admin@recyclingconnections.org the ways you have used food scraps before composting.